How to Plan a City Scavenger Hunt People Will Actually Love
A practical, step-by-step guide to choosing a route, finding great stops, writing clues, setting rules, and testing your hunt before the big day.A city scavenger hunt sounds simple: choose a few places, write a few clues, gather your favorite people, and let the fun begin.Sometimes it really can be that simple. But if you want your hunt to feel like a real adventure—not a confusing walk punctuated by arguments about what the clue was supposed to mean—you need a plan.
This guide walks you through the whole process. You’ll learn how to choose the right kind of hunt, build a safe and interesting route, select dependable landmarks, create varied challenges, set up scoring, and test everything before your players arrive.
We know how much goes into a good hunt because we’ve built 183 Scavenger Hunt Walking Tours in 23 states, and we spend more than 100 hours developing each one. Your homemade hunt does not need that much work. Thankfully! But the same basic principles will help you create something that is safe, solvable, dependable, and genuinely fun.
Before you choose a single landmark, decide who the hunt is for and what a successful experience should feel like.
A scavenger hunt for eight-year-olds should not use the same reading level, route length, or scoring system as a corporate team event. A date-night hunt should not make a couple sprint through downtown as if they are trying to qualify for the Olympics. A birthday hunt can be wonderfully personal, while a public city hunt needs clues that make sense to anyone.
What to do: Write down the age range, group size, occasion, physical abilities, likely attention span, and familiarity with the area. Then decide whether the game is cooperative, competitive, or a little of both.
Why it matters: Every later decision—distance, difficulty, pace, clue style, team size, and even the best finishing location—depends on who is playing.
Pro tip: Design for the least-mobile and least-experienced person you expect to play, not the person most excited about the event. Everyone can enjoy an easy first stop. Not everyone can enjoy discovering halfway through the route that the next clue is at the top of 87 stairs.
Common mistake: Building the hunt you would enjoy, then assuming everyone else will enjoy the same thing.
Do this now: Complete this one-sentence planning brief:
We are creating a [cooperative/competitive] hunt for [type and number of players] that should last about [time] and make them feel [curious, silly, adventurous, connected, surprised, competitive, etc.].
Questions to answer before you continue
Are the players adults, teenagers, younger children, or mixed ages?
Is this a family outing, birthday, date, vacation activity, school event, proposal, reunion, or work event?
Do you want teams to cooperate, compete, or complete the hunt together?
Does anyone need a shorter route, accessible path, frequent seating, or extra time?
Will players know the area, or will every direction need to work for a first-time visitor?
Is the main goal to win, explore, laugh, learn, celebrate, or reach a final surprise?
Once you know the answers, you have something more useful than a theme. You have a design target.
Adapt the experience to the people playing
The same route can feel completely different depending on the players. Adjust the pace, wording, challenge mix, and rules—not just the theme.
Family and Children
Keep the route shorter, use simple directions, and provide frequent wins. Mix reading with colors, shapes, counting, matching, and safe movement. Give younger players a real job: clue reader, map helper, photographer, answer recorder, or official statue-spotter.
Plan breaks before children need them. A bench, snack stop, restroom, or open lawn can reset everyone’s energy.
Adult supervision should be clear, especially near streets and crowded public areas. Do not use hiding places that encourage children to reach into unknown spaces or separate from the group.
Adults, Couples, and Date Nights
Use more wordplay, observation, local stories, and optional detours. Let the pace stay relaxed. A date-night hunt is usually more fun when players can stop for coffee, browse a shop, admire a view, or debate a clue without watching a countdown clock.
Choose a pleasant finish near a restaurant, dessert stop, scenic overlook, or place to sit. The game can create the structure for the outing without controlling every minute of it.
Birthdays and Celebrations
Personalize a few challenges around the guest of honor. Use favorite songs, shared memories, nicknames, photos, or inside jokes—but keep enough public, location-based clues that everyone can contribute.
Build toward a stronger ending: a gift, surprise guest, picnic, restaurant reservation, decorated finish, or final clue revealing the celebration location.
If you place anything at a venue or private location, get permission. Do not hide gifts or clues on unattended public property.
Team-Building Scavenger Hunts and Larger Groups
For a team-building scavenger hunt, split the group into teams of four to six so everyone has a chance to participate. Use challenges that reward collaboration: one person reads, another searches, another decodes, and another records the answer.
Stagger starts or assign different starting points to reduce crowding. Give every team identical rules, scoring, time limits, and instructions for inaccessible stops.
Avoid a scoring system that rewards only speed. A high-score format with a time-based tie-breaker encourages teams to solve together instead of sending the fastest person ahead.
Once you can describe the players, purpose, accessibility needs, and desired mood in one sentence, choose the game structure that best supports them in Step 2.
Step 2: Choose the Hunt Format
“Scavenger hunt” can describe several different games. Choose one primary format before selecting locations or writing clues, then decide how players will progress through it.
What to do: Pick the format that best matches the players and purpose you defined in Step 1. Use one main mechanic for about 80% of the hunt and add only a few complementary surprises.
Why it matters: The format controls how you reveal clues, give directions, score the game, manage groups, and rescue players who get stuck.
Pro tip: A city discovery route can include a rebus, photo challenge, or short cipher without becoming three different games. Variety works best when the method of moving through the hunt stays predictable.
Common mistake: Combining a treasure hunt, trivia contest, photo hunt, and walking tour without deciding how the game actually progresses.
Compare the four main scavenger hunt formats
Hunt format
How it works
Best for
Watch out for
Find-it hunt
Players receive a list of objects, details, colors, signs, or features to locate.
Younger children, parks, museums, and quick family activities
Generic lists feel repetitive when the items have little connection to the setting.
Photo or challenge hunt
Teams complete creative tasks and take photos or videos as proof.
It requires more route planning and testing than a checklist hunt.
Choose a find-it hunt for easy participation and quick setup, a photo hunt when creativity matters more than exact answers, a sequential hunt when the final reveal is the main event, or a city discovery hunt when you want people to explore a real place closely.
For the rest of this guide, we’ll focus mainly on a city or neighborhood discovery hunt. The same planning process also works in a park, campus, resort, downtown district, or private venue.
Choose how players progress
Fixed route: Every team follows the same stops in the same order. This is easiest to explain and works well when each clue leads naturally to the next location.
Open-order route: Teams receive all stops and choose their own order. This reduces crowding for larger events in a compact area.
Sequential reveal: Players see only the current clue. Solving it reveals the next location. This creates suspense but requires strong hints and a rescue plan.
Master list: Players find as many items or complete as many challenges as possible before time expires. This is flexible and easy to run.
For a first city hunt, a fixed loop is usually the simplest choice. Players know what comes next, you control the pacing, and nobody spends 20 minutes optimizing a route instead of playing.
Do this now: Write down one primary format, one progression method, and no more than three secondary challenge types.
With the game structure settled, define firm limits for time, distance, stops, and difficulty in Step 3.
Step 3: Set the Basic Boundaries
This is where you prevent a fun afternoon from quietly becoming an endurance event.
What to do: Set a target duration, maximum walking distance, number of stops, number of challenges, team size, route style, and win condition.
Why it matters: Without boundaries, every interesting landmark becomes another stop and every clever idea becomes another clue. The hunt gets longer, the route gets messier, and your players run out of energy before your best ending.
Pro tip: Budget time for both walking and solving. A 1.5-mile route is not a 30-minute activity when players stop 12 times, debate answers, take photos, use hints, and occasionally walk half a block in the wrong direction.
Common mistake: Estimating the duration from the map alone.
Do this now: Write your maximums at the top of your planning document and treat them like real limits.
Use one definitive planning baseline
Start with this matrix, then adjust it for the age, mobility, occasion, terrain, weather, and density of interesting stops.
Part of the hunt
Good starting target
Total playing time
60–90 minutes
Walking distance
1–2 miles
Number of physical stops
8–12 dependable stops
Number of challenges
12–20 total challenges
Team size
2–6 people per team
Route shape
A compact loop whenever possible
Start and finish
Within a 5–10 minute walk of each other
Difficulty
Mostly solvable in 1–3 minutes, with a few tougher “aha!” moments
Testing
One complete blind test by someone who did not help create it
Backup plan
At least one alternate stop or a clear skip rule
A younger group may need a 30- to 60-minute route of less than a mile. A competitive adult or team-building scavenger hunt may run 90 minutes to two hours. Treat the matrix as a starting point, not a quota.
Estimate the playing time before you build
Use this quick planning formula:
(Total route miles × 20 minutes of walking) + (Total challenges × 3 minutes of solving) = estimated playing time
For example, a 1.5-mile route with 12 challenges starts at about 66 minutes: 30 minutes of walking plus 36 minutes of solving. Add a buffer for hills, crossings, photos, restrooms, crowds, younger players, or a relaxed social pace. The blind test in Step 10 replaces the estimate with real timing.
Choose the win condition
Keep it simple. The winner can be:
The team with the highest score.
The first team to finish with all required answers.
The team with the best score before time expires.
The team chosen for the most creative photos.
Everyone—because the goal is to reach a surprise ending together.
Speed is not always the best measure. If your hunt is meant to help people explore, do not punish them for stopping to admire the very places you wanted them to notice.
A sample design brief
Players: Two to six people per team Duration: About 75 minutes Distance: No more than 1.5 miles Stops: 10 Challenges: 15 Route: Fixed loop Scoring: 10 points per correct answer, small hint penalty Winner: Highest score; fastest time breaks a tie
That one block will keep the rest of your planning focused.
Once the baseline and maximums are written down, use them to compare possible local game areas in Step 4.
Step 4: Choose a Safe, Walkable Game Area
A great clue cannot rescue a bad route.
Choose an area where players can spend most of their time looking at the city—not worrying about traffic, missing sidewalks, locked gates, or whether they are allowed to be there.
What to do: Look for a compact downtown, historic district, waterfront, public park, pedestrian area, or other location with several interesting public features close together.
Why it matters: The route is the experience connecting every clue. If those transitions feel stressful, confusing, unsafe, or boring, the whole hunt feels worse.
Pro tip: Walk the area at the same time of day and, if possible, the same day of the week when your event will happen. A peaceful plaza on Sunday morning may be a crowded lunch destination on Friday. A public-looking passage may be locked after 5:00 p.m.
Common mistake: Assuming that because a mapping app draws a line, the route is safe, pleasant, legal, and open to the public.
Do this now: Choose two possible areas and perform the route audit below before committing to either one.
Find promising pedestrian zones in your area
Do not begin with the whole city. Identify two or three compact local zones where several public points of interest sit within a comfortable walk.
Search for:
[Town or city] pedestrian master plan
[Town or city] historical society walking map
[Town or city] downtown business association directory
[Town or city] public art map
[Town or city] historic district map
[Town or city] self-guided walking tour PDF
Municipal planning documents can reveal pedestrian corridors, crossings, trails, and accessibility projects. Historical societies often publish routes connecting dependable landmarks. Downtown associations and visitor bureaus can help you identify clusters of public art, plazas, civic buildings, and practical amenities.
Mark each promising cluster on a map, draw a rough one- to two-mile boundary, and confirm that the area offers a sensible start, finish, restroom or break option, and enough public landmarks. These sources help define where to scout; they do not replace walking the area yourself.
Your route audit
Sidewalks: Is there a continuous, usable walking path?
Crossings: Are major streets crossed at signals, marked crosswalks, or other sensible locations?
Traffic: Will players need to stand near fast-moving vehicles while reading or solving?
Public access: Can every stop be reached without entering private property, paying admission, passing a gate, or relying on a business being open?
Lighting: Is the route appropriate for the time of day?
Crowds: Will teams block a narrow sidewalk or create problems for other visitors?
Terrain: Are there hills, stairs, loose surfaces, or long stretches without shade?
Accessibility: Can you offer an accessible route, or clearly explain any unavoidable limitations?
Practical needs: Are there restrooms, water, seating, parking, or public transportation nearby?
Cell service: If the hunt is phone-based, is service reliable enough along the route?
Construction: Are any sidewalks, plazas, or landmarks temporarily blocked?
Start and finish: Can people gather without obstructing a doorway, business, roadway, or busy path?
Places that often work well
Historic downtown districts with public plaques, architecture, art, and short blocks.
Waterfront promenades with public paths and clear landmarks.
Civic centers with plazas, memorials, libraries, and public art.
Public parks with monuments, gardens, bridges, signs, and gathering areas.
College districts or campuses only when the intended route is clearly open to the public and does not depend on entering buildings.
Museums, resorts, gardens, and private venues only when you have permission and understand admission and operating-hour requirements.
Places to avoid
Routes that require players to cross high-speed roads repeatedly.
Areas with missing sidewalks or long walks beside traffic.
Stops visible only from private property.
Interior locations that may be locked or closed.
Paid or gated attractions unless admission is part of your event.
Narrow spaces where multiple teams will create congestion.
Isolated areas that feel uncomfortable after dark.
Any stop that requires climbing, stepping into landscaping, touching fragile objects, or ignoring posted rules.
A beautiful landmark on the wrong side of a six-lane road is not a good scavenger hunt stop. It is a beautiful landmark you should enjoy from somewhere else.
After selecting one compact, walkable zone, scout more candidate landmarks than you need so Step 5 can eliminate weak or unreliable stops.
Step 5: Find Interesting, Dependable Stops
Now you get to explore.
Look for statues, plaques, murals, historic buildings, public art, architectural details, fountains, clocks, memorials, mosaics, bridges, unusual signs, and other features people can safely inspect in person.
The key word is dependable. A good stop needs to survive until game day—and ideally long after it.
What to do: Build a larger list of candidate stops than you need. Photograph each one, record its exact location, note how players will approach it, and write down at least one possible question.
Why it matters: Interesting places are not automatically useful game stops. You need locations that are accessible, permanent, safe, worth the walk, and capable of producing a clear answer.
Pro tip: Find roughly twice as many candidates as you expect to use. It is much easier to build a smooth route from 20 possibilities than to force 10 mediocre stops into service because those are the only ones you recorded.
Common mistake: Falling in love with a landmark first, then trying to invent a question that does not naturally fit it.
Do this now: Run every candidate through the five checks below.
The Five Checks Before a Stop Makes the Cut
A stop should be:
Publicly accessible. Players can reach the correct viewing point without entering private property, paying admission, or depending on an unlocked door.
Permanently installed. The clue does not depend on a sandwich board, seasonal banner, storefront display, temporary sculpture, parked vehicle, or object that can easily move.
Safe to approach. Players can stop, read, discuss, and answer without standing in a roadway, blocking a doorway, or crowding a dangerous edge.
Interesting enough to justify the walk. The site adds beauty, history, humor, surprise, or local character.
Suitable for a verifiable answer. The correct answer is physically present, reasonably readable, and unlikely to produce a debate.
If a stop fails one of the first three checks, remove it. If it fails the last two, keep looking for a better question—or a better stop.
Good stop versus poor stop
Better choice
Poorer choice
Why
A bronze plaque mounted beside a public fountain
A chalkboard menu outside a café
The plaque is more permanent and does not depend on a business being open.
A large mosaic visible from a wide public plaza
A tiny date carved above a second-story window
Players can gather safely and see the feature without binoculars.
A public statue with a distinctive pose and readable base
A temporary art installation with an unknown removal date
The permanent statue is more dependable.
A historic building with a name and year on the façade
An attractive building with no visible identifying details
The first can support a clear on-site question.
A public memorial reached by a sidewalk
A monument inside a gated courtyard
Public access does not depend on a gate or operating hours.
Find the question while you are at the stop
Do not merely photograph the whole landmark. Capture the exact detail players will need to see.
Ask yourself:
What makes this place different from the previous stop?
What can players discover here that they cannot answer from home?
Is the text large enough to read?
Is there only one reasonable answer?
Will the answer still be here next month?
Can I explain exactly where to look without giving the answer away?
If the clue depends on a web search, the physical stop is not doing enough work. The best city-hunt questions reward players for being present and paying attention.
Once you have vetted 15 to 20 dependable stops, the next step is stringing the strongest ones together into a logical physical path, which we cover in Step 6.
Step 6: Build a Route That Keeps the Hunt Moving
You now have a collection of good stops. Your next job is turning them into one good experience.
What to do: Arrange the stops so players move through the area efficiently, avoid unnecessary backtracking, and encounter something interesting every few minutes.
Why it matters: A great set of landmarks can still produce a frustrating hunt if the route zigzags across busy streets, repeats the same block, or includes long stretches with nothing to see or do.
Pro tip: Give players an easy win near the beginning. The first challenge should confirm that they understand the game and are in the right place. Save your cleverest puzzle for after they have built some confidence.
Common mistake: Numbering the stops in the order you discovered them instead of the order players should experience them.
Do this now: Plot all finalists on a map, then trace at least three possible routes before choosing one.
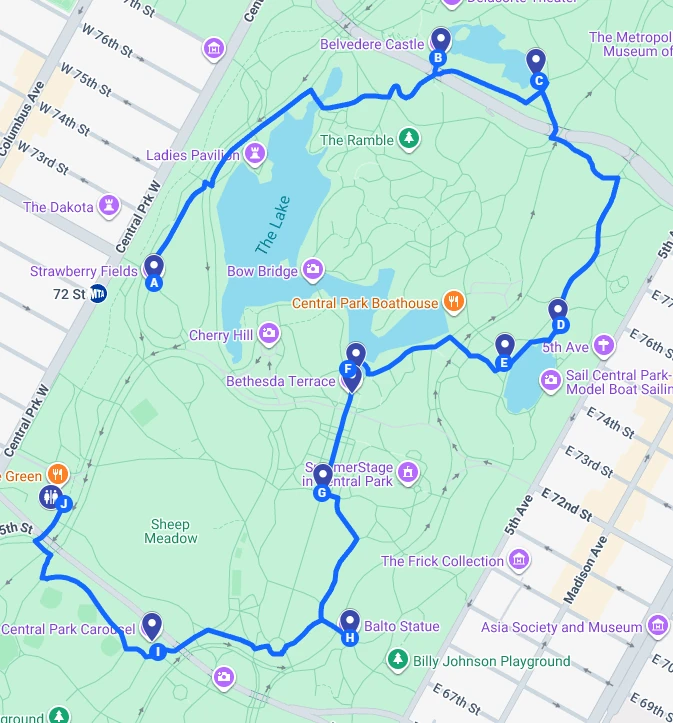
Example of how to plot stops and a route on My Maps in Google Maps.
(See an interactive version of that map and feel free to make your own copy if it here.)
Loop route or one-way route?
A loop route starts and finishes near the same place. It is usually best for family outings, dates, and events where people return to parked cars, restaurants, hotels, or a gathering point.
A one-way route can work when the finish is a meaningful destination or both ends have easy transportation. It can also create a satisfying sense of progression. Just make sure nobody discovers at the finish that their car is two miles away.
An open-order route lets teams choose their own sequence. This is useful for larger groups because it spreads teams out, but it requires a compact area and a clear map.
Build better pacing
Put the first stop within a short, obvious walk of the starting point.
Use a simple first question so players learn how your clues work.
Avoid placing several difficult puzzles in a row.
Alternate reading-heavy stops with visual, physical, or playful challenges.
Include one or two scenic or surprising moments that are enjoyable even without a question.
Break up long walks with a bonus observation or a clear “keep going” landmark.
Place the hardest clue before the final stretch, not at the very end when everyone is tired.
Finish somewhere pleasant, easy to recognize, and suitable for photos, prizes, food, or a final reveal.
Eliminate dead distance
Every transition does not need a formal challenge. But long empty stretches drain energy.
When two excellent stops are far apart, you have four choices:
Add a worthwhile stop between them.
Create a short walking observation, such as spotting three architectural details along the way.
Change the route.
Remove one of the distant stops.
The fourth choice hurts for about 30 seconds. Making everyone walk 15 dull minutes for one merely decent question hurts much longer.
Check every transition in person
Stand where players will finish one clue, then follow your written direction to the next stop without using your memory. Look for forks, hidden paths, duplicate building names, confusing entrances, construction, or places where “turn left” depends on which direction someone happens to be facing.
Whenever possible, use stable landmarks and street names:
Walk toward the clock tower and cross Pine Street at the signal. Continue along the public plaza until you reach the bronze fountain on your right.
That is more dependable than:
Go left, walk for a while, and look for the fountain.
Players should solve your puzzles—not your directions.
With the physical path settled, Step 7 turns those locations into a balanced sequence of challenges.
Step 7: Create a Balanced Mix of Challenges
Variety makes a hunt feel like an adventure. Randomness makes it feel like homework written by five different teachers.
What to do: Choose several challenge types and give each one a purpose. Mix visual observation, on-site facts, wordplay, decoding, counting, matching, and creative tasks.
Why it matters: Repeating the same question format becomes predictable. Using a completely different mechanic at every stop makes the rules harder to understand. A balanced mix keeps players alert without making them relearn the game 15 times.
Pro tip: Let the location suggest the challenge. A mural may inspire visual matching. A plaque may support a fill-in-the-blank question. A row of decorative symbols may create a counting puzzle. Do not force a cipher onto a stop merely because you have not used a cipher yet.
Common mistake: Adding a puzzle only for novelty, even when it has little connection to the location or route.
Do this now: Create a challenge inventory before writing the final wording.
Challenge types that work well
Observation questions: Find a color, shape, figure, symbol, unusual detail, or difference between two features.
Plaque or landmark questions: Read a specific line, identify a date, complete a phrase, or locate a fact that is clearly present.
Riddles and wordplay: Use a short riddle to identify a nearby object or reveal the next location.
Rebus puzzles: Combine pictures, symbols, and word fragments to name a landmark or instruction.
Ciphers and decoding: Use a short Caesar shift, Pigpen cipher, number-to-letter code, or simple substitution.
Sorting or sequencing: Arrange dates, names, objects, or details into a meaningful order.
Matching: Pair close-up details with buildings, symbols with meanings, or facts with landmarks.
Counting challenges: Count a clearly defined set of permanent features.
Photo challenges: Re-create a pose, frame a landmark, or capture the team completing a safe task.
Local-history questions: Ask about information displayed at the location rather than requiring obscure prior knowledge.
A starter mix for a 15-challenge hunt
Four observation questions.
Four questions using plaques, signs, art, or architectural details.
Two wordplay or rebus challenges.
Two counting, sorting, or matching challenges.
One short cipher.
Two photo or creative team challenges.
You do not need to follow that exact recipe. It simply prevents 13 plaque questions followed by a frantic last-minute photo challenge because someone remembered the hunt was supposed to be fun.
Use local history without turning the hunt into a trivia test
Local stories can make a city come alive, but players should not need a history degree—or a search engine—to answer.
A weak history question asks:
Who served as mayor when this building opened?
A stronger on-site question asks:
Find the dedication plaque beside the entrance. Which mayor’s name appears directly above the year 1912?
The second question still teaches history, but it rewards observation instead of prior knowledge.
Once the challenge mix has a deliberate rhythm, Step 8 converts each idea into exact wording, accepted answers, and useful hints.
Step 8: Write Clear Clues, Answers, and Hints
A clue should create a satisfying moment of discovery. It should not create a committee meeting about what the organizer probably meant.
What to do: Write each direction, clue, correct answer, accepted answer variation, and hint. Then read the entire item as if you have never seen the location.
Why it matters: You already know the answer, the route, and the landmark. Your players do not. That makes you the least qualified person to judge whether your own wording is obvious.
Pro tip: Read every clue aloud. Awkward wording, missing words, and accidental ambiguity become much easier to hear than to see.
Common mistake: Writing from the creator’s point of view: “Look at the plaque” when three plaques are visible, or “find the old building” in a district where every building is old.
Do this now: Use the clue formula below for every challenge.
The anatomy of a dependable clue
A strong challenge usually contains four parts:
Location: Where should players stand?
Focus: What exact object, plaque, façade, artwork, or section should they inspect?
Task: What should they do—read, count, compare, decode, match, or photograph?
Answer format: Are you asking for a word, number, name, date, phrase, or photo?
For example:
At the fountain beside City Hall, find the bronze plaque mounted on the low stone wall. Read the final line. Which two-word phrase appears immediately before the year?
The player knows where to go, where to look, what to do, and what kind of answer to submit.
A good clue should be
Solvable at the location. The needed information is physically present.
Clear about what players are looking for. They do not need to inspect six unrelated objects.
Challenging without depending on obscure knowledge. The thinking happens after they find the right information.
Based on one unambiguous answer. Reasonable people should reach the same result.
Supported by a useful hint. Getting stuck should slow players down, not end the game.
Unaffected by temporary objects. The answer does not depend on movable signs, changing displays, business inventory, or seasonal decorations.
Frustrating clue versus better clue
Frustrating clue
Better clue
“What happened here in 1924?”
“On the bronze plaque beside the fountain, what two-word event is listed after the year 1924?”
“Count the windows.”
“On the red-brick second floor, how many arched windows face Oak Street?”
“Find the statue and name the person.”
“Find the bronze figure holding a rolled document. What last name is carved on the front of the base?”
“Go to the old bank.”
“Walk to the stone building at 10 Pine Street with BANK carved above its three center arches.”
“What color is the mural?”
“What color is the bird directly above the painted moon in the mural?”
The better clues are not necessarily easier. They are more precise.
Plan accepted answers
Write the official answer, then list reasonable variations before anyone plays.
For a person named “Dr. Elena M. Ruiz,” you might accept:
Elena Ruiz.
Dr. Ruiz.
Ruiz.
Elena M. Ruiz.
For a number, decide whether “twelve” and “12” both count. For a phrase, decide whether punctuation or capitalization matters. Usually it should not.
Avoid questions where several answers are technically defensible. If you find yourself preparing a paragraph explaining why your preferred answer is more correct than the obvious alternative, rewrite the question.
Write hints that help without spoiling the fun
A good first hint tells players where to look.
Look below the figure’s right hand.
A stronger second hint tells them what to notice.
You need the last word in the second line.
The hint should reduce frustration while preserving a small discovery. “The answer is LIBERTY” works as an emergency rescue, but it is not much of a hint.
For a sequential hunt, always provide a way to continue. One impossible clue should not strand the entire group beside a fountain for the rest of the afternoon.
With the clue content written, Step 9 defines the rules, scoring, teams, and day-of logistics that make it runnable.
Step 9: Establish Rules, Scoring, Teams, and Logistics
Good rules are short enough to read and clear enough that you do not need to negotiate them midway through the game.
What to do: Decide how teams are formed, how they start, how points work, how hints affect scoring, what happens if a stop is unavailable, what equipment players need, and how the winner is determined.
Why it matters: Players will make different assumptions unless you tell them otherwise. One team will use every hint immediately. Another will refuse all help. A third will send one person sprinting ahead while everyone else gets coffee.
Pro tip: Keep the scoring simple enough to calculate without building a second game about calculating the first game.
Common mistake: Creating an elaborate scoring system with different values, bonuses, multipliers, time deductions, photo judges, and secret achievements that nobody fully understands.
Do this now: Write the rules on one screen or one sheet of paper. If they do not fit, simplify them.
Form the teams
For most hunts, teams of two to six people work well. Smaller teams make it easier for everyone to participate. Larger teams tend to form an active inner circle while everyone else follows behind asking what the question was.
For a large event:
Divide the group into teams of four to six.
Give every team the same written rules.
Assign one captain to manage the phone, answer sheet, or packet.
Encourage the captain to rotate who reads each clue.
Stagger fixed-route starts by several minutes, or give teams different starting stops.
Choose a finish where everyone can gather without blocking public space.
Choose a simple scoring system
Here is an easy starting model:
Correct answer: 10 points.
Completed photo challenge: 5 or 10 points.
First hint used: minus 2 points.
Skipped challenge: 0 points.
Tie-breaker: fastest verified finishing time.
You can also skip hint penalties entirely. If the goal is a relaxed family outing, the hint is part of the fun—not a moral failing.
Decide how the hunt starts
A simultaneous start creates energy but can crowd the first stop.
A staggered start reduces congestion but requires accurate timing.
Different starting stops work well for open-order hunts, but every team should receive equivalent opportunities and the same finish deadline.
Prepare the practical details
Fully charged phones or printed packets.
Portable battery packs for longer phone-based hunts.
Pens or pencils.
Clipboards if people will be writing while standing.
A map or route overview.
The organizer’s phone number.
Water and weather-appropriate clothing.
A plan for restrooms and breaks.
A meeting point and finish deadline.
Prize, final reveal, or celebration supplies.
Include a missing-stop rule
Something will eventually be covered, fenced off, under construction, surrounded by an event, or temporarily inaccessible. Tell players what to do:
If a stop is closed or unsafe to approach, do not enter a restricted area. Take a photo showing the obstruction, skip the challenge, and continue to the next stop. The organizer will review it at the finish.
That one rule protects the game from real life.
Sample safety rules
Stay on public sidewalks and paths.
Cross streets only at safe, legal crossings.
Do not enter private property or restricted areas.
Do not climb on statues, monuments, walls, fountains, or landscaping.
Do not remove, mark, attach, or hide anything on public property.
Do not block doors, sidewalks, ramps, or other visitors.
Do not ask strangers to participate unless the challenge clearly says to do so and the setting makes it appropriate.
If a direction feels unsafe, stop and contact the organizer.
A scavenger hunt is supposed to create good stories. “Then we argued with security” is not one of the stories you are aiming for.
Once the route, clues, rules, and contingency plan are documented, give the complete experience to a fresh tester in Step 10.
Step 10: Test It With Someone Who Did Not Create It
Testing is the step most homemade scavenger hunts skip—and the step that makes the biggest difference.
You know what every clue means because you wrote it. You know which side of the building to approach, which plaque matters, and which spelling variation you had in mind. Your players know none of that.
What to do: Give the hunt to someone who did not help create it. Ask that person to follow the directions, solve the challenges, use the hints, and finish without your assistance.
Why it matters: A real test reveals confusing transitions, unreadable signs, ambiguous answers, inaccurate timing, poor phone formatting, dead ends, and clues that seemed much better at your desk.
Pro tip: During the blind test, do not rescue the tester the moment they hesitate. Watch what they do, where they look, and what they assume. Their confusion is not an interruption. It is the result you need.
Common mistake: Walking the route with a friend while casually explaining every unclear instruction, then declaring the hunt tested.
Do this now: Schedule one complete blind test before you announce that the hunt is ready.
Check spelling, numbering, links, accepted answers, point values, and clue order. Verify that every hint belongs to the correct question.
2. Route test
Walk every transition. Confirm distances, crossings, access, cell service, restrooms, and total time. Check the route at the intended time of day.
3. Blind playtest
Give the hunt to a new person or team. Let them play without coaching. Record every place where they hesitate, disagree, backtrack, misread, or ask for help.
4. Final format test
Use the same phone, printout, QR code, form, or packet players will receive. Make sure text is readable outdoors, buttons work, images load, answer fields behave correctly, and printed pages are in the right order.
What to observe during the blind test
Can the tester find the starting point?
Does each direction lead to the intended viewing location?
Can the tester tell which object the clue refers to?
Is the answer visible and readable?
Does the tester submit the answer you expected?
Are accepted variations handled fairly?
Does the hint help?
Are any questions dramatically easier or harder than the rest?
Does the route feel smooth?
Does the full experience fit the promised time?
Is the finish obvious and satisfying?
Keep a simple issue log
Step
What happened
Why it happened
Revision
Stop 3 direction
Tester entered the wrong plaza
Two entrances fit the wording
Add the street name and fountain landmark
Stop 5 answer
Tester entered “three” instead of “4”
Counting area was unclear
Specify “including the small arch above the door”
Stop 8 hint
Hint did not help
It repeated the clue
Point to the lower-right corner of the mural
Finish
Tester was unsure the game had ended
No final confirmation
Add a completion message and meeting instructions
Prepare a backup
You do not need a second version of the entire game. You should have at least one of these:
A nearby backup stop.
A skip rule.
A substitute question that can be answered from another visible feature.
An organizer contact method.
A printed copy of essential instructions in case a device fails.
If the blind test reveals that routing and clue writing require more time than you want to invest, you can bypass the build phase and use a ready-made Scavenger Hunt Walking Tour in your city. One $49 purchase covers a group of up to six people, with the route, clues, puzzles, hints, and scoring already prepared.
Once the test team can complete the hunt without you, you are ready to launch it. Gather everyone, explain the rules, start the clock if you are using one, and let them explore.
At the finish, announce the winner, share the funniest photos, reveal any disputed answers, and celebrate. A small prize is nice. Bragging rights can be surprisingly powerful. Snacks are almost universally appreciated.
With a tested game in hand, choose only the tools you need to deliver it reliably.
Tools to Help Plan a Scavenger Hunt
You need only four capabilities: map the route, research candidate places, create any special puzzles, and organize or deliver the game. Choose the smallest tool stack that covers those jobs.
Linking a printed packet to audio, video, hints, forms, or digital puzzles
Never attach codes to property without permission; include a fallback URL and test multiple phones.
For a printable hunt, a practical stack is My Maps + the Scavenger Hunt Walking Tours planning template + one puzzle tool + Canva. For a phone-based hunt, use My Maps + the Scavenger Hunt Walking Tours planning template + Google Forms, adding an interactive puzzle or QR code only when it contributes something useful.
Simple is dependable. Dependable is fun.
Examples of City Scavenger Hunt Challenges
The best examples teach you how to create more challenges—not merely give you a list to copy. The fictional prompts below use generic landmarks, so they will not spoil any real Scavenger Hunt Walking Tour.
1. Observation Challenge
Sample prompt:
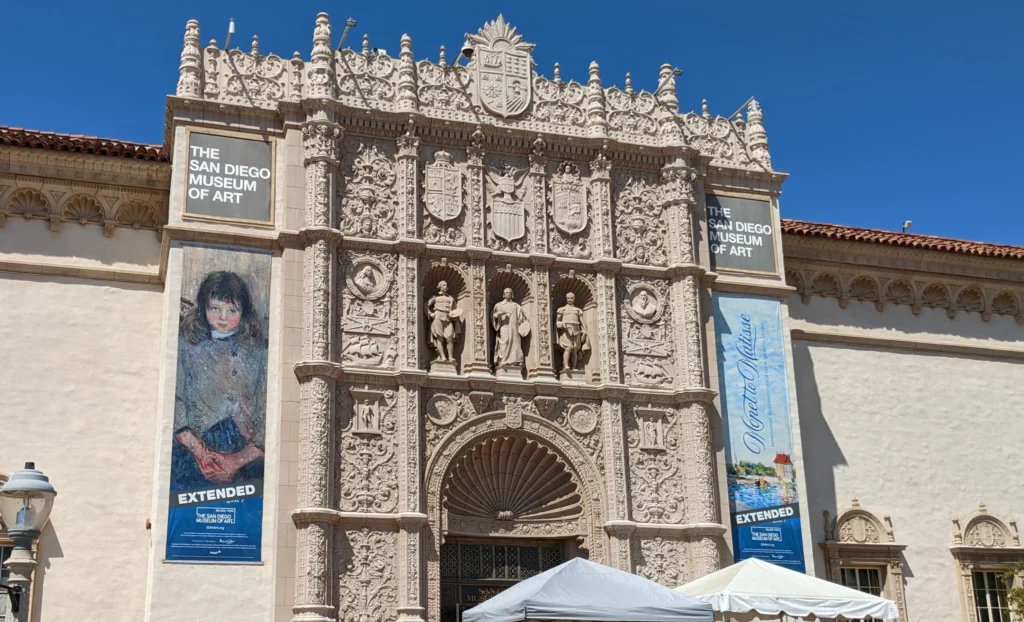
Find facade at the Museum’s main entrance. How many ships are carved into the facade?
Facade of the San Diego Museum of Art. Spoiler for our San Diego Balboa Park Scavenger Hunt Walking Tour!
Why it works: It directs players to one stable architectural feature and asks them to identify a distinctive detail.
Make it easier: Offer four answer choices.
Make it harder: Ask players to use the first letter of the answer in a final word puzzle.
2. Plaque Fill-in-the-Blank
Sample prompt:
Find the dedication plaque beside the fountain. Complete the final sentence: “May this place always inspire ______.”
Why it works: The answer is physically present, the location is specific, and the requested text has a clear boundary.
Make it easier: Tell players the answer contains seven letters.
Make it harder: Ask for the second and fifth letters of the missing word to create a code.
3. Carefully Defined Counting Challenge
Sample prompt:
At the blue mosaic wall, count only the gold stars that touch the outer white border. How many are there?
Why it works: “Only,” “gold,” and “touch the outer white border” define exactly what counts.
Make it easier: Include a close-up photo showing the correct section.
Make it harder: Have players subtract the number of blue circles from the number of gold stars.
Counting questions are fun in moderation. Nobody dreams of spending Saturday afternoon counting 73 identical fence posts.
4. Riddle Plus Observation
Sample prompt:
I have a face and two hands, but no arms or legs. Find me above the old station entrance. What time is frozen on my face?
Why it works: The riddle identifies the object, while the on-site observation provides the answer.
Make it easier: Add, “You are looking for a clock.”
Make it harder: Remove the building name and lead players there with a separate direction.
5. Rebus Destination
Sample prompt:
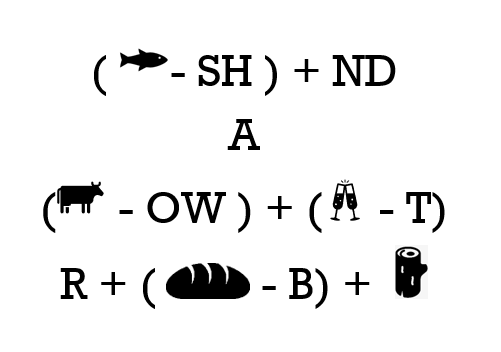
Solve this rebus to discover your next landmark:
Answer: Find a Coast Redwood.
Why it works: The puzzle reveals a useful destination and creates an immediate “got it!” moment.
Make it easier: Provide a list of nearby landmarks.
Make it harder: Use letter removal or replacement rules instead of two direct images.
6. Short Caesar Cipher
Sample prompt:
Each letter below has been moved one place forward in the alphabet. Move every letter back one place to reveal your next destination: GPVOUBJO
Answer: FOUNTAIN.
Why it works: The rule is supplied, the message is short, and the answer leads somewhere useful.
Make it easier: Decode the first letter for the players.
Make it harder: Let a nearby inscription reveal the shift number.
7. Sorting Challenge
Sample prompt:
Four nearby markers each show a year and a letter: 1888–G, 1901–A, 1912–T, and 1956–E. Put the markers in order from oldest to newest. What word do the letters spell?
Answer: GATE.
Why it works: Players use real information, perform a simple reasoning task, and produce a meaningful instruction.
Make it easier: Tell them the result is a four-letter location.
Make it harder: Do not print the years; require players to find them on four nearby features.
8. Visual Matching Challenge
Sample prompt:
Your player sheet shows four close-up photos: a carved owl, a brass key, a stone flower, and a tiny ship. Match each detail to one of the four buildings around the plaza. Which detail belongs to the building with the green doors?
Why it works: Players inspect multiple buildings without needing to read a long passage.
Make it easier: Label the buildings A through D on a map.
Make it harder: Use tighter close-ups that require more careful searching.
9. Safe Photo Challenge
Sample prompt:
Find the bronze explorer pointing toward the river. Without touching or climbing the statue, have your team re-create the pose and take a photo.
Why it works: It creates a fun memory, encourages teamwork, and clearly states the safety boundary.
Make it easier: Require only one teammate in the photo.
Make it harder: Ask the whole team to create a scene inspired by the statue.
10. On-Site Local-History Challenge
Sample prompt:
Read the marker beside the old stone building. It first served as a bank, later became a library, and finally became what?
Why it works: Players learn a local story, but the answer is available to anyone standing at the stop.
Make it easier: Offer three choices.
Make it harder: Ask players to combine the building’s three uses into a chronological code.
Should You Make Your Own or Choose a Ready-Made Hunt?
By now, you can probably see why a polished city scavenger hunt involves more than writing a few riddles.
Making your own can be absolutely worth it. It gives you complete control and lets you create something personal. A ready-made hunt is better when you want the experience without spending hours scouting, mapping, writing, formatting, and testing.
Question
Make your own
Choose a ready-made hunt
Planning time
Several hours or more, depending on complexity
A few minutes to choose and purchase
Personalization
Nearly unlimited
Built around the destination rather than your specific group
Route research
You select and verify every stop
Already researched and mapped
Clue writing
You create every clue, answer, and hint
Already written
Testing
You recruit testers and revise the game
Already tested
Scoring
You create and manage it
Built into the experience
Materials
You design, print, or build the phone delivery
Accessed through your phone
Cost
Can be inexpensive in dollars, but requires your time
$49 for the whole team at Scavenger Hunt Walking Tours
When you can play
After you finish building and testing it
Any day or time that fits your schedule
Creating your own is best when
You want clues based on friends, family members, or shared memories.
You are planning a proposal, surprise, custom birthday, or private-property event.
You need a highly specific theme.
You enjoy creating games as much as playing them.
The planning itself is part of the fun.
A ready-made hunt is best when
You want a spontaneous family activity or date.
You are visiting a city and want an interactive way to explore it.
You need an activity for this weekend—not a new hobby for the next three weekends.
You do not want to scout public access, write clues, build a route, or recruit testers.
You want scoring, hints, and directions already organized on your phone.
For most casual city hunts, aim for 60 to 90 minutes. That is long enough to feel like a real outing without exhausting people.
A hunt for younger children may work better at 30 to 60 minutes. A team-building scavenger hunt with more stops and competitive scoring may run 90 minutes to two hours.
Remember to include walking, solving, wrong turns, photos, breaks, and discussion in your estimate. Then test the real route. Your spreadsheet does not get tired, need a restroom, or stop to admire a dog in a tiny sweater. Your players might.
How many stops should a city scavenger hunt have?
For a 60- to 90-minute hunt, 8 to 12 physical stops is a useful target. Some stops can support more than one challenge, especially when a plaza contains several artworks, plaques, or architectural features.
Quality matters more than quantity. Ten strong, dependable stops are better than 18 stops padded with weak questions.
How many clues do I need?
A typical 60- to 90-minute hunt can use 12 to 20 challenges. Use fewer when the puzzles are involved, the walking distance is longer, or the players are younger. Use more when the questions are quick observations in a compact area.
Do not confuse “more clues” with “more fun.” The hunt should end while people are still enjoying it.
How long should the walking route be?
For most city hunts, aim for 1 to 2 miles. A shorter route is better for young children, hot weather, hills, accessibility needs, or dense areas with many good stops.
Distance alone can be misleading. One flat mile through a pedestrian district may feel easy. One mile with stairs, crowds, traffic signals, and steep hills may not.
How do I make scavenger hunt clues that are not too easy?
Add a small reasoning step after players locate the correct information.
Instead of asking, “What year is on the plaque?” ask players to use the year to select letters, arrange several dates, calculate a simple difference, or identify which event happened first.
Keep the needed information on-site. Difficulty should come from observation and problem-solving—not from vague wording or obscure trivia.
Then test the clue. A question that feels easy to its author may be completely invisible to everyone else.
How do I plan a scavenger hunt in my area?
Start with a compact public district that has sidewalks and several landmarks close together. Map 15 to 20 candidate locations, walk the area, and keep the 8 to 12 stops that are public, permanent, safe, interesting, and capable of supporting a clear answer.
Connect them with a simple route, write a mix of challenges, establish rules, and have someone else test the full game.
The prize does not need to be expensive. Good options include:
A small trophy that can be reused at future events.
Gift cards to a local café or ice-cream shop.
First choice of dessert or restaurant.
Themed medals or ribbons.
A funny traveling trophy.
Small local souvenirs.
Printed team photos.
Awards for best teamwork, funniest photo, cleverest answer, or strongest comeback.
For a relaxed family hunt, the finish can simply be a picnic, treat, or surprise destination.
How do I organize a scavenger hunt for a large group?
Divide the group into teams of four to six, give every team identical rules, and stagger starts by several minutes. Another option is an open-order hunt with different assigned starting stops.
Use a fixed finish deadline, simple scoring, and one captain per team. Choose a gathering point with enough space and avoid sending every team to a tiny first stop at the same time.
Test the route while imagining several teams standing at each location. A clue that works beautifully for four people may create a sidewalk traffic jam for 40.
Can I create a scavenger hunt using Google Maps?
Yes. Google My Maps is especially useful because you can add custom markers, organize stops into layers, draw your planned route, store notes, and share or print the map.
Use the map for planning, then walk the entire route. A digital map cannot confirm that a sign is readable, a gate is open, a construction fence has appeared, or a crossing feels comfortable with children.
What should I do if a clue or landmark disappears?
Prepare a skip rule, alternate question, or backup stop before the event.
Tell players never to enter a closed or unsafe area. Let them document the problem, skip the question, and continue. For a sequential hunt, provide an emergency way to reveal the next location so one missing object does not end the entire game.
Afterward, remove or rewrite the clue before the next group plays.
Can I find a ready-made scavenger hunt near me?
Probably! Browse every Scavenger Hunt Walking Tours location to find a phone-guided adventure near you. You follow clues, solve puzzles, answer questions, and explore at your own pace. No reservation is required, and one $49 purchase covers your whole team.
Ready to Make One—or Play One?
You now have everything you need to create a scavenger hunt that is more than a list of random objects.
You know how to choose the right format, set realistic limits, find safe and dependable stops, build a smooth route, write better clues, create fair rules, and test the whole experience before anyone plays.
Make Your Own
Open the printable planning checklist, choose your game area, and start collecting candidate stops. Your first draft does not need to be perfect. It needs to be testable.
Play a Ready-Made Hunt
Would you rather skip the scouting and get straight to the adventure? Find a Scavenger Hunt Walking Tour near you. Follow clues on your phone, solve fun puzzles, see interesting sights, and try to earn the high score.
Get outside, explore somewhere interesting, and have some fun. That is the whole point!